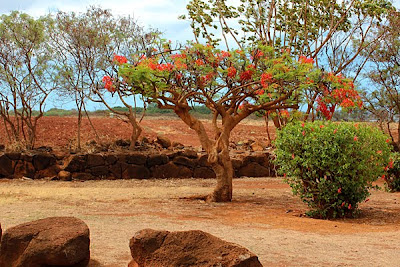
It's relatively easy to simulate an IR look by manipulating an existing digital file.

I found a "recipe" online for simulating the look of infrared photography via my old version of Photoshop from someone who allegedly (sorry, I can't help from slipping into "lawyerspeak" now and then) nicked it in 2004 from Digital Photo magazine. I found it worked best on landscape photos, like the one above.
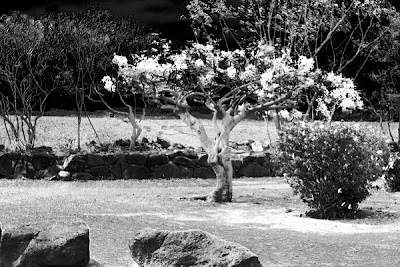
(1) Channel mixer: monochrome. Start all at zero, whack the Blue to -150%, then Red up to around 150%, tweak with some green. If lots of foliage, do the green first, and add some Red (say 30%). You've got to fiddle around to get the best results (but start with blue down first)
(2) To simulate the glow around the highlights that IR film gives:
* Click D to reset foreground/background colours to Black/White
* Filter / Distort / Diffuse Glow
* Graininess=0, Glow Amount=1, Clear Amount=9
(3) Then add realistic grain (on a separate layer:
* Call up layers palette
* New empty layer
* Edit / Fill - 50% gray
* Blend mode to Overlay
* Filter / Noise / Add Noise
Gaussian, Monochromatic. Between 10-20%
* Filter / Texture / Grain
Grain Type = Enlarged
Intensity = 0 (for B&W)
Adjust Contrast (around 30)
Here's the result of the first effort:

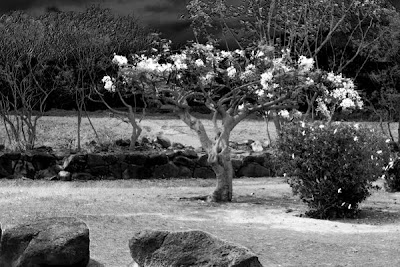
However, I wasn't happy with the sky, so I started again. Note the Photoshop receipes are like cooking recipes: you have to experiment to find out what you like best...

Note that this version also has less severe shadows in the bush and rocks at the foreground. Here's the revised recipe:
(1) Channel mixer: monochrome. Start all at zero, reset Blue to -150%, reset Red to 100%, green=8.
(2) * Click D to reset foreground/background colours to Black/White
* Filter / Distort / Diffuse Glow
* Graininess=0, Glow Amount=1, Clear Amount=13
(3) Then add realistic grain (on a separate layer:
* Call up layers palette
* New empty layer
* Edit / Fill - 50% gray
* Blend mode to Overlay
* Filter / Noise / Add Noise
Gaussian, Monochromatic. Between 10-20%
* Filter / Texture / Grain
Grain Type = Clumped
Intensity = 0 (for B&W)
Adjust Contrast (around 30)

No comments:
Post a Comment